My last photography studio was in a hip, up-and-coming part of the city that suddenly became the newest place in town to renovate due to a big development project. The quiet cigar factory turned artist colony was purchased for a large sum of money and under construction constantly. All that noise and chaos was not good for my business or my creativity and I knew it was time to (unfortunately) get out.
This started me on a journey of finding a new photo studio space where I could grow my business and get comfortable for the long term. And, since I have done this a time or two before, I thought I would share my process and steps for finding and renovating a photo studio.
First, let me show you some before and after photos that will really blow your mind. Then, after you watch the walk-through of my new space, I’ll give you the steps to create your own dream photo studio renovation. Let’s go!


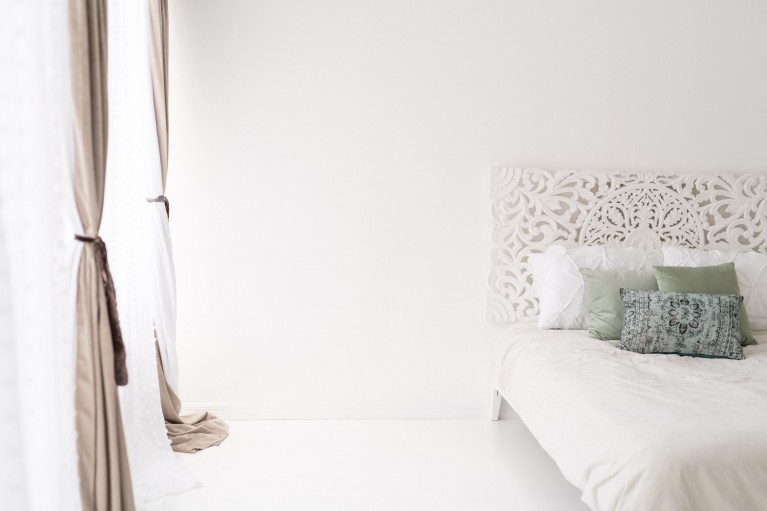
As you can see, it was quite a transformation! The new space I rented had good bones and all the space I needed, but it was… ugly. Luckily, I had a vision of what this space could be with a few functional changes and a lot of decorating. I knew I could take this dark, drab space and make it into my light, bright dream photography studio. Let’s take a tour of my new photo studio!
Walk through my new photography studio with me!
5 Steps to creating your dream photo studio renovation.
Finding and creating your dream photography studio isn’t as hard as it might seem. Yes, you’ll shed a bit of blood, sweat and tears, but it’s so worth it. In the end you’ll have a space that is uniquely yours. And in the photography industry, setting yourself apart by having a defined style all your own is really important.
1. List your needs (don’t compromise!) and look for a space.
By now you should know what you really need in a photo studio. This is the time to list those needs on paper. Think carefully, because you will use this as a guide to pick your perfect studio space. Below is my list. This is my fourth studio and I wanted everything to be perfect. After being in several spaces with little issues that ended up being big problems, I’ve learned which things are important and which are changeable.
Here are my top characteristics for a new photo studio (by order of importance):
1) Good light
2) Easy access
3) Closer to my home
4) Bathroom in the space
5) Separate shooting and getting ready areas
6) Ability to have light-colored floors
7) Space for studio lights
8) No stairs
9) In a good part of town
10) $1200 a month or less
I was looking for something specific, since this is a photo studio I plan to be in for a while. When looking for a commercial space I have always had more luck hitting the pavement and driving around as opposed to looking online, but Craigslist was a good starting point. I found a space that fit all of my requirements and knew it would be the perfect photo studio renovation.

2. Review and sign your lease.
Once you find a space that fits your qualifications, make sure you have a lawyer look over the lease. You need to make sure you’re happy with the terms. Don’t be afraid to negotiate. Does the space need work or improvements? Will you be expected to make those improvements? Make sure everything is spelled out and then have a professional look things over so you don’t have unhappy surprises down the road. I made the mistake of not doing a thorough review before and it almost cost me my business. Trust me, it is cheaper and easier to thoroughly understand and review the terms of the lease in the beginning.


3. Design your studio space.
Your next step should be to design a mood board. It is a great way to get an idea of what you are envisioning your photo studio space to be. That way, you can make sure during each step along the way that your choices in decor will match your vision. I am a natural and clean photographer and I wanted my studio to show that (with a touch of vintage & wood — which I adore). Making a mood board was critical in fleshing out my ideas.
Another crucial part to designing a new space is using a layout designer. There are tons of programs online for room design. I used Easy Home Homestyler. I input my room dimensions and where all the interior walls were, and then started playing around with my furniture and how I wanted to lay things out.
My shooting space is long and skinny, so I knew right away I was going to create a moving wall that would divide the space and make one side natural light (for more lifestyle portraits) and the darker back half would be set up with studio lights. Using a room designer was so important, as it gave me a reality check as to what I could actually do in the space. The space is 1200 square feet but the actual shooting area is only about 500. When set up properly, this is plenty of room.
If you want a studio that fits you and your shooting style, create a layout that works. Plan everything out; do the work. It will pay off in the end. Once I had a solid layout for my photo studio renovation, I could plan everything else and I didn’t make costly mistakes or have to move the furniture all over the place. We had a plan and stuck to it.


4. Begin your renovation.
Your next step will be to pick the fun stuff — flooring, furniture, shelving — and doing the the not-so-fun stuff — laying the floor, painting the walls and hanging the shelves. Because I had a detailed blueprint, this was really just filling in the blanks for me (this is why the design step is so important!). Still, it can be a time consuming and stressful part of the process.
Since I came from a large studio, I already had most everything I needed for the new studio space. However, picking floors that were durable, affordable and in line with my style proved a challenge. My family is very handy, so we did all the work ourselves, but if you are hiring people out, make sure to check licenses, recommendations, and previous work. Don’t choose the cheapest contractor. Choose the right contractor for the job (that is exactly how we want our clients to choose their photographer, right?). Cutting corners on this part makes for headaches in the end.
Here are the projects I did for my photo studio renovation to create an aesthetic that fits my style:
1) Painted everything white (I used Sherwin Williams paint).
2) Painted the floors of the shooting area with a white two-part epoxy concrete paint from Sherwin Williams.
3) Made a wall out of drywall and two-by-fours, and then mounted casters to the bottom to move it easily and divide the space.
4) Hung shelves in the shooting room for props.
5) Made double curtain rods out of cast iron pipes.
6) Laid bamboo floors in the waiting room.
These projects took about a month and a half to complete (working part time). With multiple contractors we could have done it faster, however we had a bit more time and wanted to do things inexpensively.


6 Signs you might be ready for a new studio
1. Your studio has limitations and is hindering your creative process. There is a saying about cameras: Use the camera you can afford until you max out it’s capabilities. I think the same applies for studios. If you want to take dancer portraits but don’t have tall enough ceilings, maybe it is time to find something that suits you.
2. The part of town where your space is located turns off clients. You need a place that your clients feel safe driving up to. If you are getting lots of pushback on that point, it might be time to look for something more in line with your client’s values and expectations.
3. Even when perfectly organized, your space looks cluttered because you don’t have enough storage. If you have too many props it is time for one of two things: a new studio or a prop sale.
4. Your style has evolved. If over time your style has changed, and your current studio doesn’t fit your previous aesthetic, it might be time to consider an updated location.
5. Your commute is too long. If you don’t want to make the trip to work you won’t get anything done. This career is too amazing to dread anything about it — find something that makes your drive more manageable and enjoyable.
6. Your old studio no longer serves your business needs. Maybe you’ve simply outgrown your studio, or maybe you’re taking on different clients (families instead of newborns or headshots instead of children). Your studio should evolve with your business needs.
5. Decorate your new studio!
This is the fun part — the part where your creativity really shines! I like to use the space for a while before filling it up with decor. That way I can make any last minute tweaks to my setup and make sure I am using it as efficiently as possible.
I purchased some studio samples and decals for the walls and windows with my logo and inspirational quotes. I want my photography studio space to look comfortable yet beautiful. If there was a job of professional studio designer, I would love to take that job. I think designing a space that is beautiful and functional is a fantastic endeavor.


Watch me design my studio wall display:
Studio Photo Wall Design from Click & Company on Vimeo.
My whole photo studio renovation project took two and a half months. My children had the summer off with me, so my time working was a bit limited. Our total amount spent was $3,350, including moving costs, paint, flooring, furniture. By making a clear plan I kept the stress and costs to a minimum. I don’t plan on moving again, but love the process of studio design.
If you’re looking for a new studio or hoping to renovate a photo studio, I hope this article helps you out! Please share your before and afters with me, or leave me a comment with your renovation story.
Thank you for sharing your space. Can you please share the dimensions and/or plans for your moveable wall? The colors that’s you chose to paint the black and white sides would be helpful as well. Thank you!
Hi Kate! The wall is 8 feet x 8 feet (exactly the size of two pieces of drywall put together). I actually had so many questions that I made a blog post about how I made it! You can see it here: https://www.alisonwinterroth.com/moving-magnetic-photography-backdrop-wall/