For the typical photographer looking to get started in newborn photography, the startup cost can be a huge obstacle. The price of quality props, outfits, and education on safe newborn posing adds up very quickly. But, good news, I’m going to show you 3 DIY newborn props that are easy, inexpensive and relatively quick to create.
When I first started my business, it wasn’t possible for me to buy the best of the best right away so I had to prioritize my budget. The one area I would never take shortcuts on is newborn safety. It is so important to be sure you are 100% confident in handling these precious little ones with the utmost respect for their comfort and safety.
Therefore, I invested heavily in courses and mentorships with the leading experts in the field before I ever scheduled my first newborn photo session. It was some of the best money I could’ve spent on my photography business because it really set me up for success.
However, it left little room in my budget for the newborn photo props I would need to complement the cute babies I would be bringing into my studio. So, I got busy figuring out how to make some DIY newborn props. With a little trial and error, some help from Pinterest and YouTube, I found three easy and inexpensive solutions that anyone can do on their own — even those who aren’t crafty by nature!
1. Coordinating stretch wraps and tiebacks
These are the perfect start to your newborn photo prop collection because both girls and boys can use them. Stretchy newborn wraps are wonderful for helping fussy babies feel safe and secure enough to drift off into a deep sleep. They also help offset the startle reflex that often wakes a baby as you are carefully posing them. For this project, I got most of my materials on sale at Walmart or with a 40% coupon from Hobby Lobby, which kept the cost low.
Materials:
- Stretchy jersey knit fabric. I used an infinity scarf from Walmart that was on sale for $3. Sadly, it is no longer on sale but you can use any type of jersey knit fabric. Keep your eyes out for sales and snatch them when they are cheap!
- Flowers (found in the scrapbooking aisle of Hobby Lobby)
- Wooden beads, pearls, moss, lace, or any other embellishments you’d like to use.
- Scissors
- Hot glue gun
Directions:
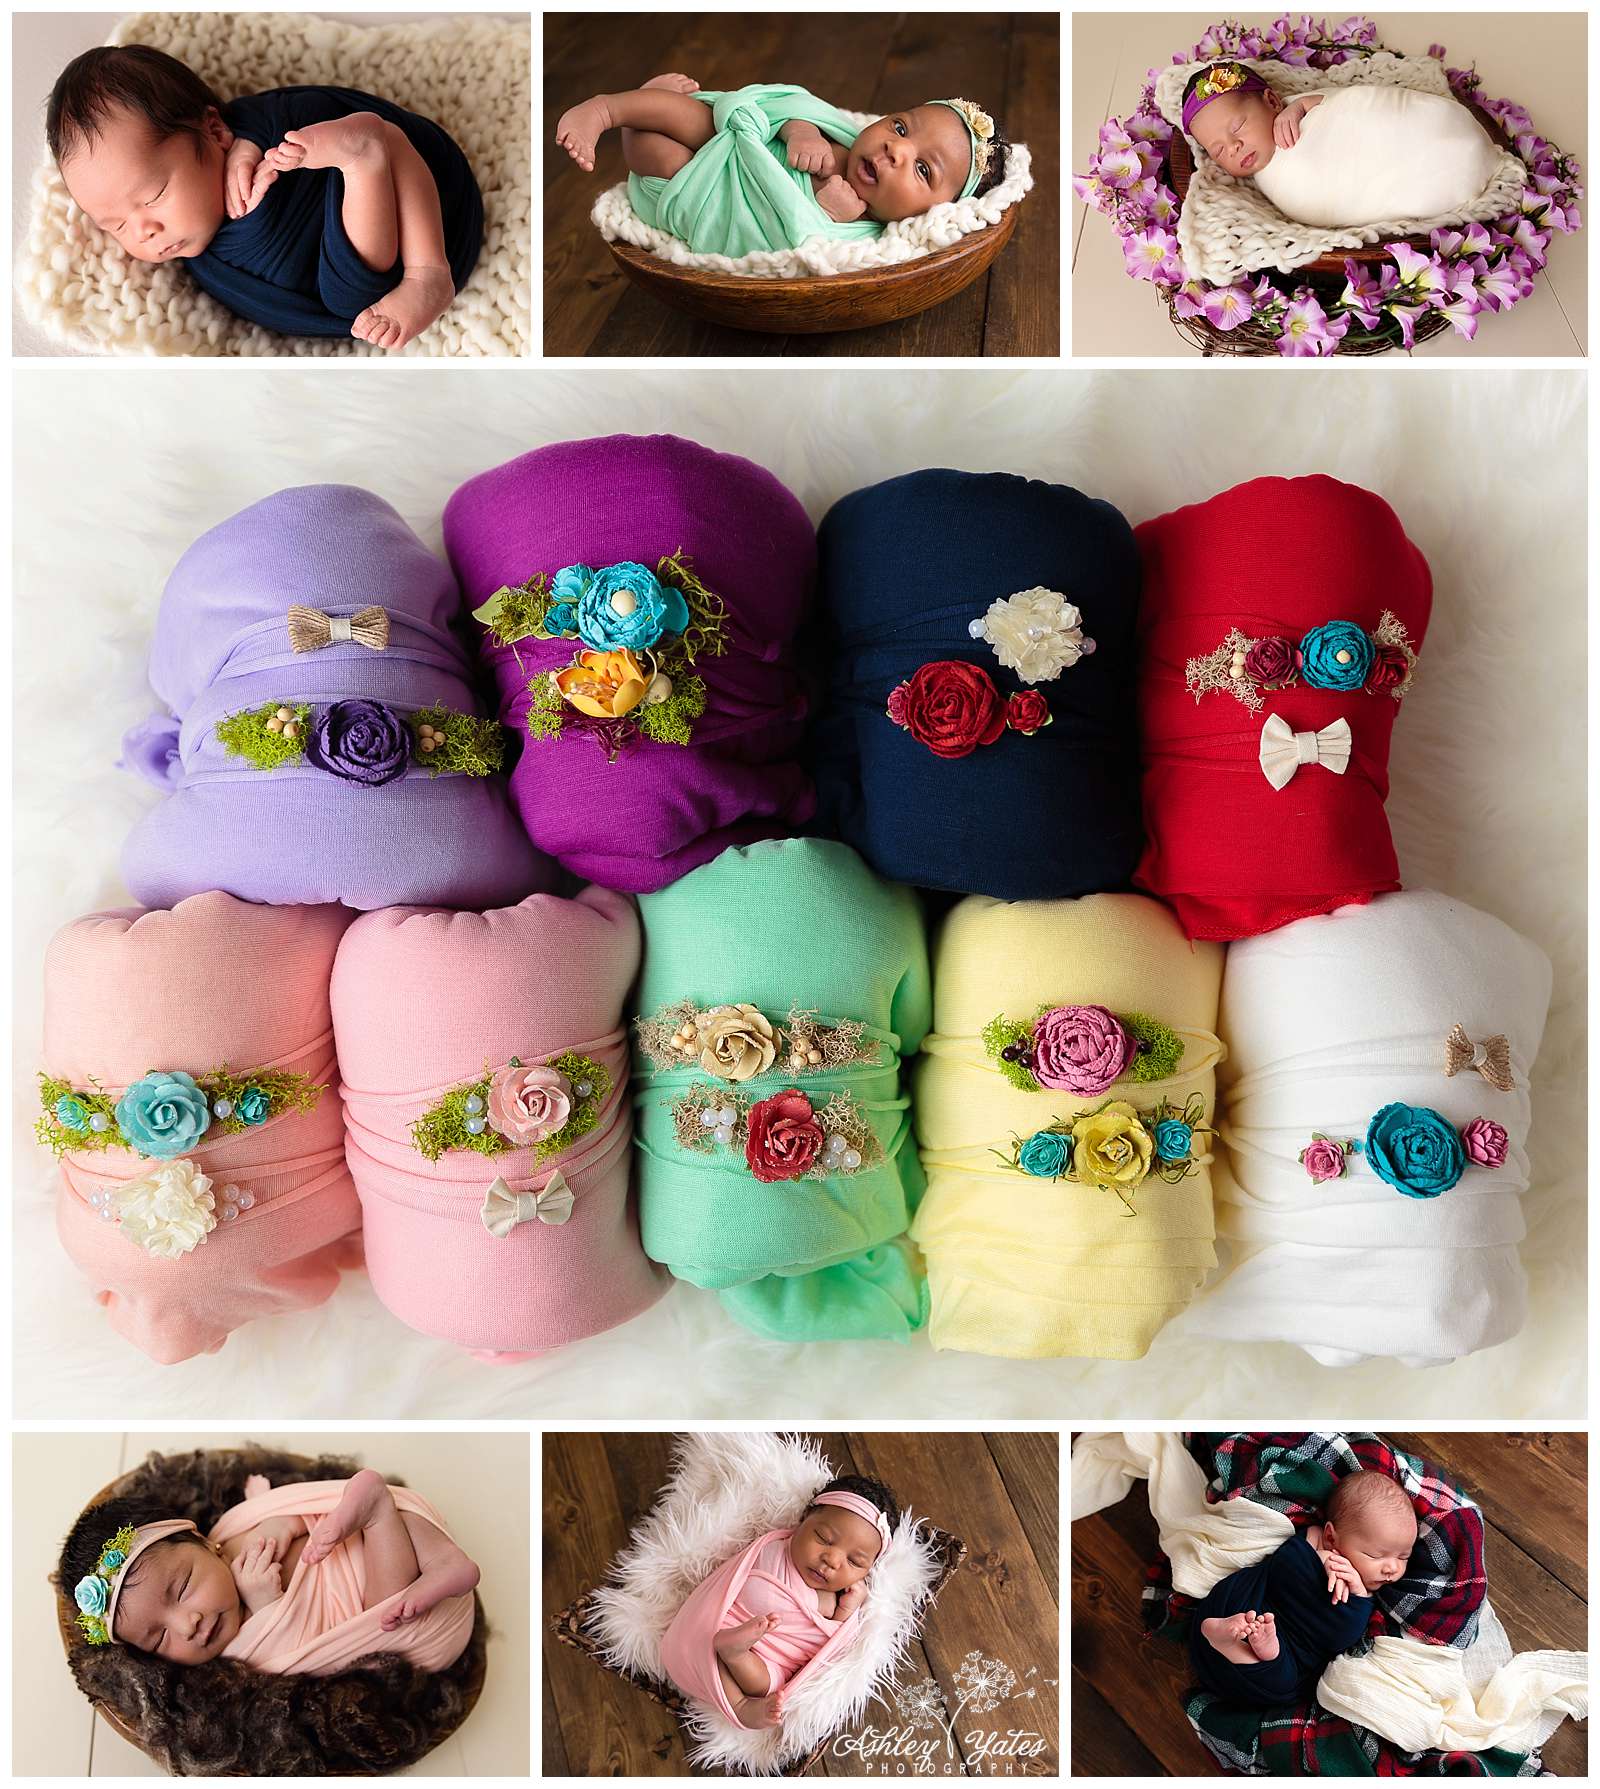
1. If you are using an infinity scarf, begin by cutting along the seam turning it into one long rectangular piece of fabric. For reference, it measures around 36”x64” when cut. It is a lot of fabric for a wrap so I just fold it in half lengthwise before wrapping. I find this beneficial when using light colored fabrics that tend to be a little see-through. With the extra fabric, I can leave the diaper on the baby and it won’t show through. If you prefer a narrower wrap, simply cut yours in half lengthwise and create two wraps!
2. From the short edge, measure 1.5 – 2 inches and cut a strip. I folded this strip in half and cut it into two strips so that I could make two tie-backs from each strip.
3. Hold each of the small tieback strips by the ends and tug as hard as you can. Stretching the fabric in this manner causes it to curl in on the raw edges which adds a nice finishing touch without having to sew!
4. Lay out your embellishments in any arrangement you’d like and hot glue in place. I found that using a toothpick for the smaller pieces helped keep me from burning my fingers. After your glue dries, you can experiment with other design elements, like tying knots on either side of the design. I did some with knots and some without. That is part of the fun – there are no rules and no limits to the creative possibilities! Your designs will be one of a kind.
5. If you sew, you can sew the ends together to make a headband instead of a tieback for a different variation on this project. If you prefer to keep it simple, tie the ends in a bow or knot when putting it on the baby.
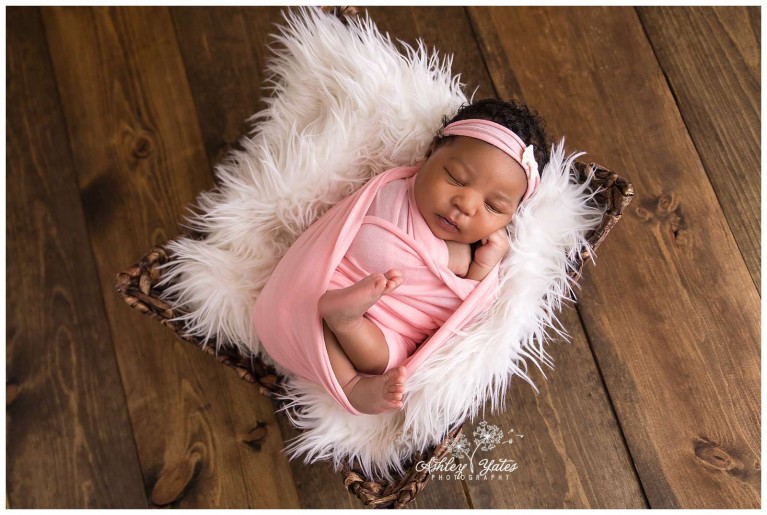
Results:
I was able to make 9 different color wraps with 2 coordinating tiebacks for around $6 each. I still have tons of embellishments left over to make more so my next DIY newborn wraps will cost even less.
2. Faux curly background layer
Using different materials to give dimension and texture to your image can really add a lot of visual interest. This is a fun project and is easy enough to do while you are watching your favorite guilty pleasure binge on Netflix. I actually made mine on a road trip while my husband drove.
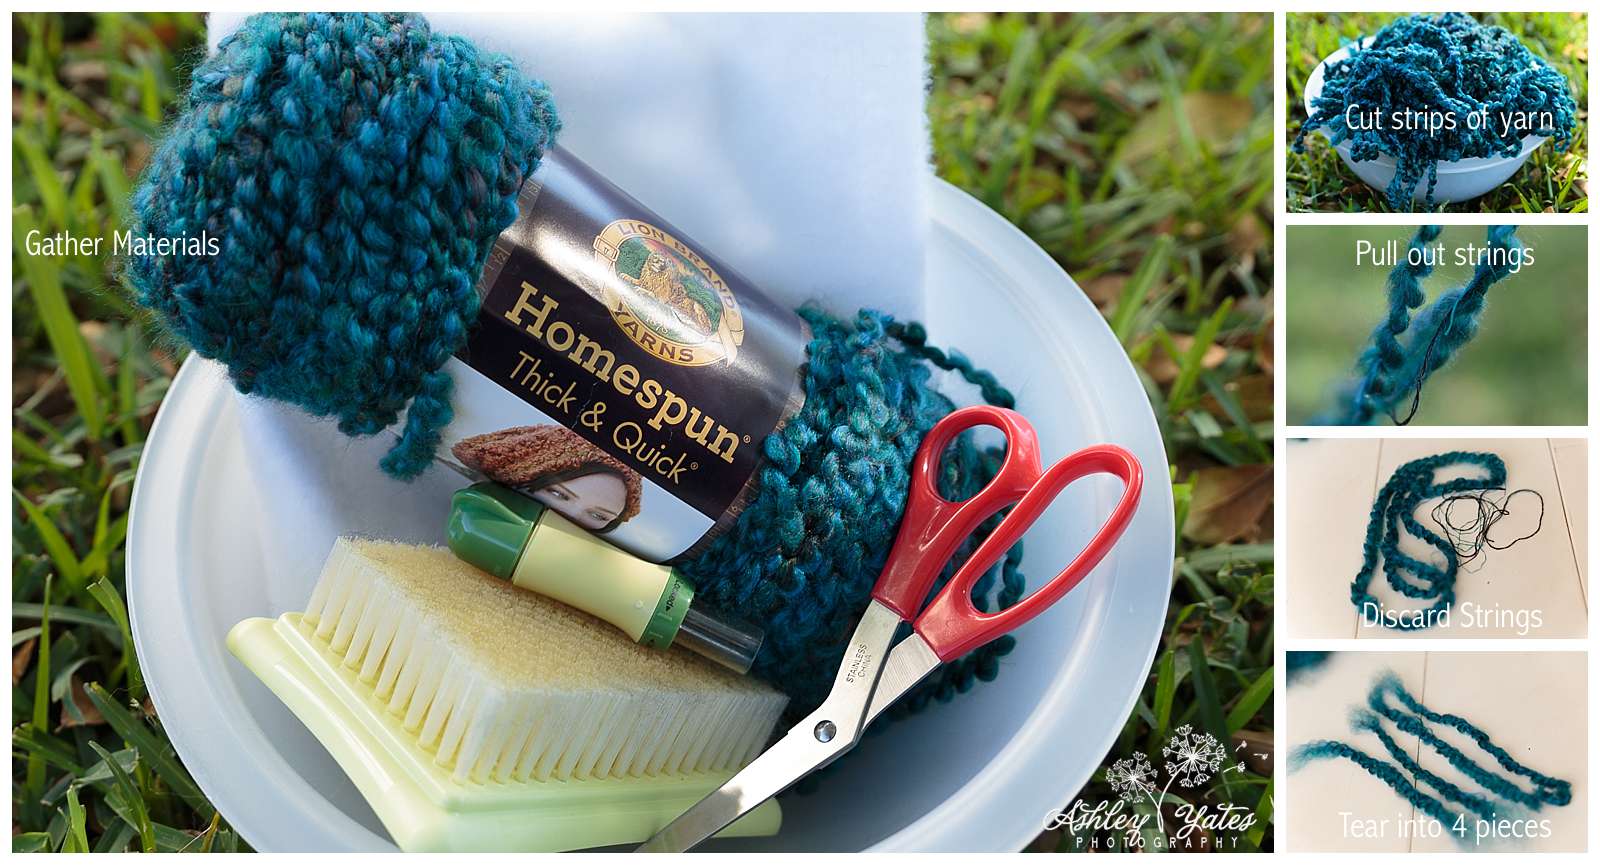
Materials:
- 1 skein of Lion’s brand Homespun Thick and Quick Yarn in the color of your choice.
- A piece of felt cut to the size you would like your layer to be. You can use 9×12 sheets at Hobby Lobby for $0.33 or if you plan to make bigger layers you can buy it by the yard in the fabric section. I found some 36×36 squares on Amazon for around $5. I made my layers 18”x 18” so I was able to get 4 squares out of one piece.
- Needle felting tool
- Needle felting mat
Directions:
1. Turn on your favorite form of entertainment. The Bachelor or This Is Us make a perfect accompaniment to this project! This requires no thinking, just a lot of repetitive motion so get cozy and settle in!
2. Cut strips of yarn approximately 1 yard long. I did not measure precisely. Instead, I cut them the length of my arm as I was pulling the yarn from the skein. I found it more time efficient to go ahead and cut the entire skein, making a pile in a large bowl as I went.
3. Once you have the pieces cut, you can put away the scissors. Three strings hold each piece of yarn together. Look closely and you will see one single string (green in my example) and then two strings that are grouped together (black). We will deconstruct this yarn by gently pulling these strings out.
4. Start with the single string and pull gently until it comes out. If the yarn gets bunched up and the string won’t come out easily, release the tension on the string and gently pull the wool at the bottom until it loosens up a bit.
5. Once you have removed the single string, you will do the same for the double string. Discard the strings.
6. With the wool now deconstructed, I pulled the ends of the wool to separate it into two equal pieces. Then I did the same with those two pieces tearing them in half so you end up with four shorter pieces from each longer strand you cut.
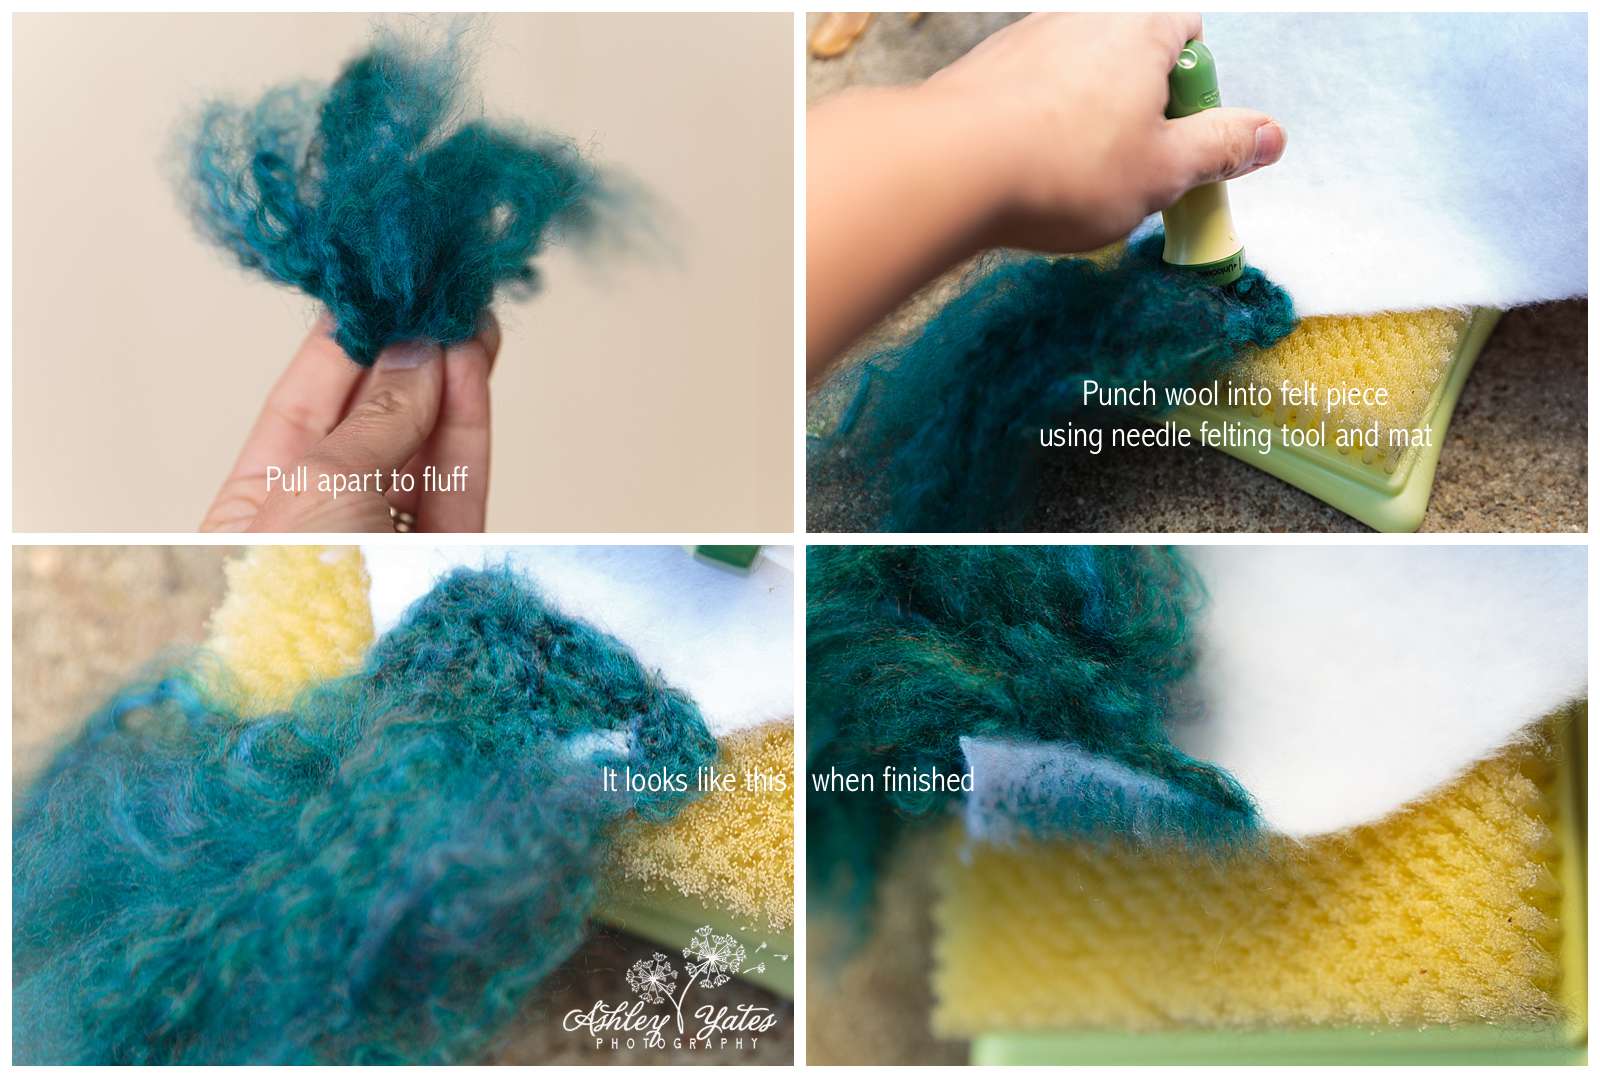
7. Pull the wool apart to fluff it up. The more you pull, the fluffier it will be. If you prefer a curlier look, don’t pull it quite as much.
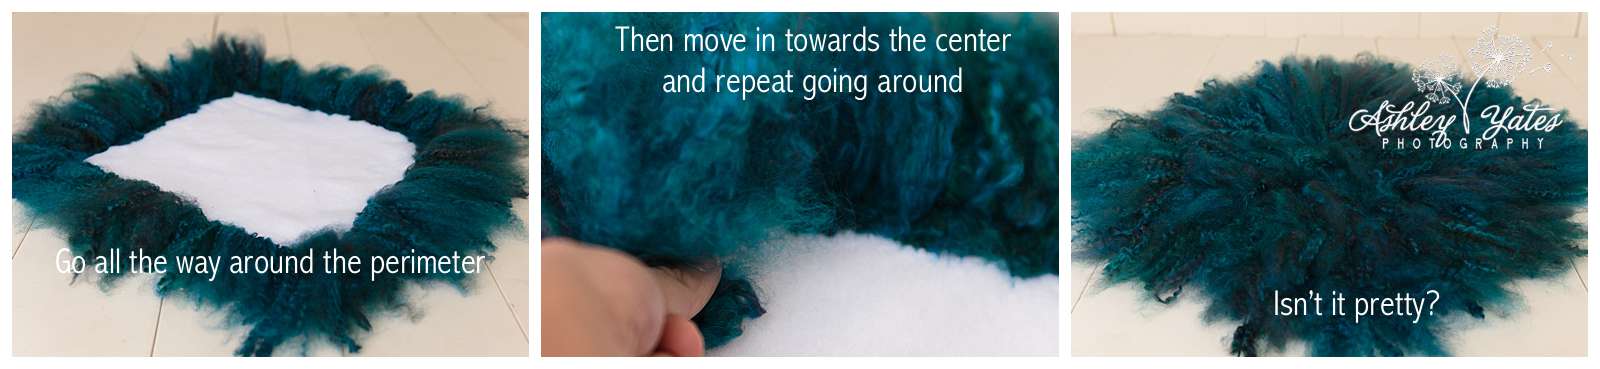
8. At this point, you can bring out your felt piece and place it on top of the felting mat. Fold your fluffed piece of deconstructed wool in half and use the felting needle tool to interweave the fibers into the felt piece. Each time you press down with the felting needle tool, it pushes the end of your wool through the piece of felt and binds the two together. The more you punch with your felting needle tool, the more secure your wool will be.
9. I started at a corner and worked my way around the perimeter of the piece of felt. Then I moved in towards the center and continued repeating steps 5-7 until the entire piece of felt was covered. For an 18”x 18” square, I used almost the entire skein of yard. But for a smaller layer, you could get by with using less yarn.
Safety tip: Frequently check your felting needles as you work. Sometimes the needles can break off and it can be difficult to find in all the wool. Of course, anything you intend to use with a baby should be needle-free! Checking frequently can help narrow down your search if a needle does break.
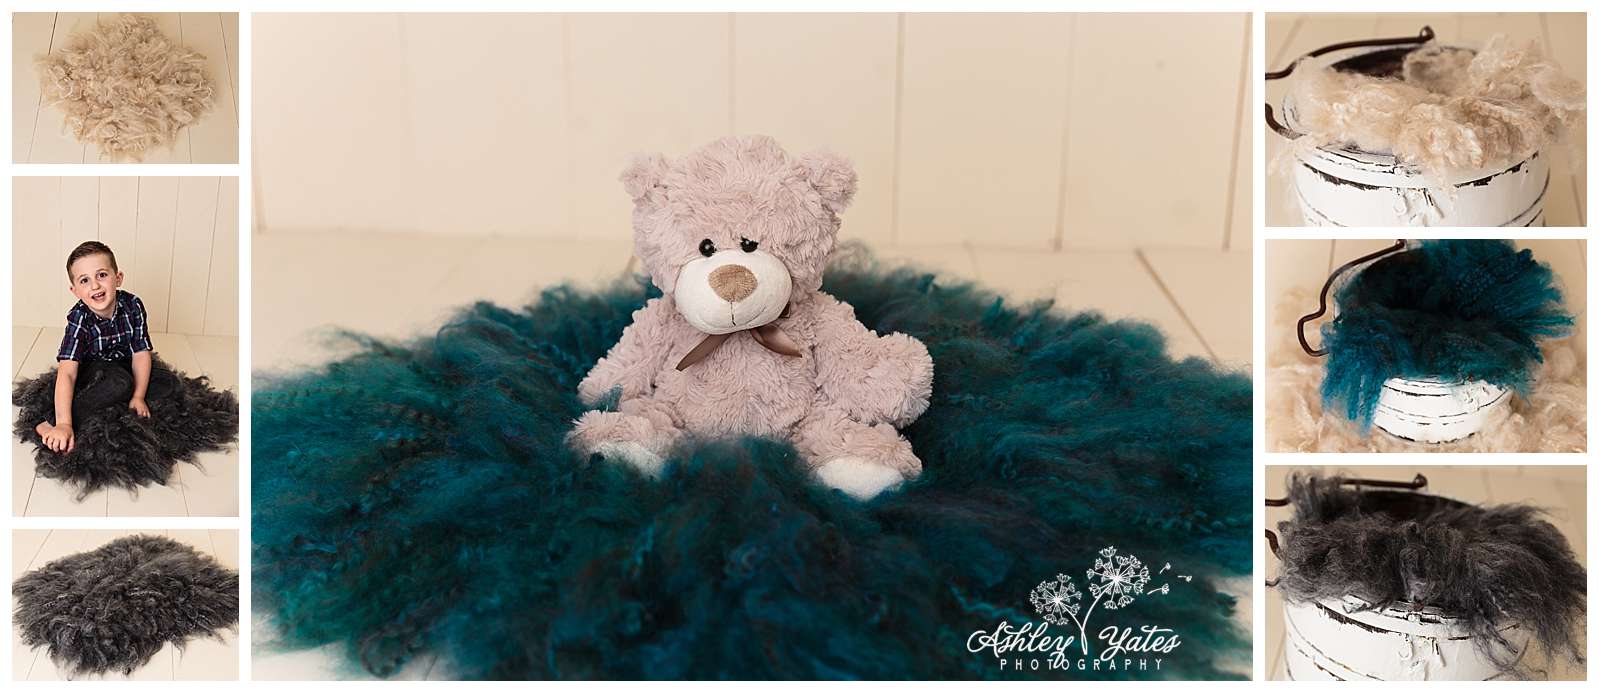
Result:
3. Upcycled newborn outfit made from a thrift store sweater
This project is perfect for those who love the thrill of repurposing items and finding treasures at thrift stores! This will also give you a one-of-a-kind outfit for your little models. We will be using one sweater to create each set (plus an optional coordinating shirt).
Materials:
- An old sweater from your closet or a thrift store. I found mine at Goodwill for around $5 each. You will want to look for sweaters with quite a bit of stretch to them and of course something in a desirable color or pattern.
- If you choose to make pockets or embellishments for your set, go ahead and pick up another shirt/sweater that coordinates.
- Yarn, ribbon, or elastic
- Sewing machine or needle and thread
- Scissors
- Bodkin or safety pin
Directions:
We will make the hat and tieback out of the sleeve and the pants out of the body of the sweater. This sweater can make 2-3 hats depending on the style, at least two pairs of pants, and multiple tiebacks. This is perfect for twin sets or just for different style options.
Pants:
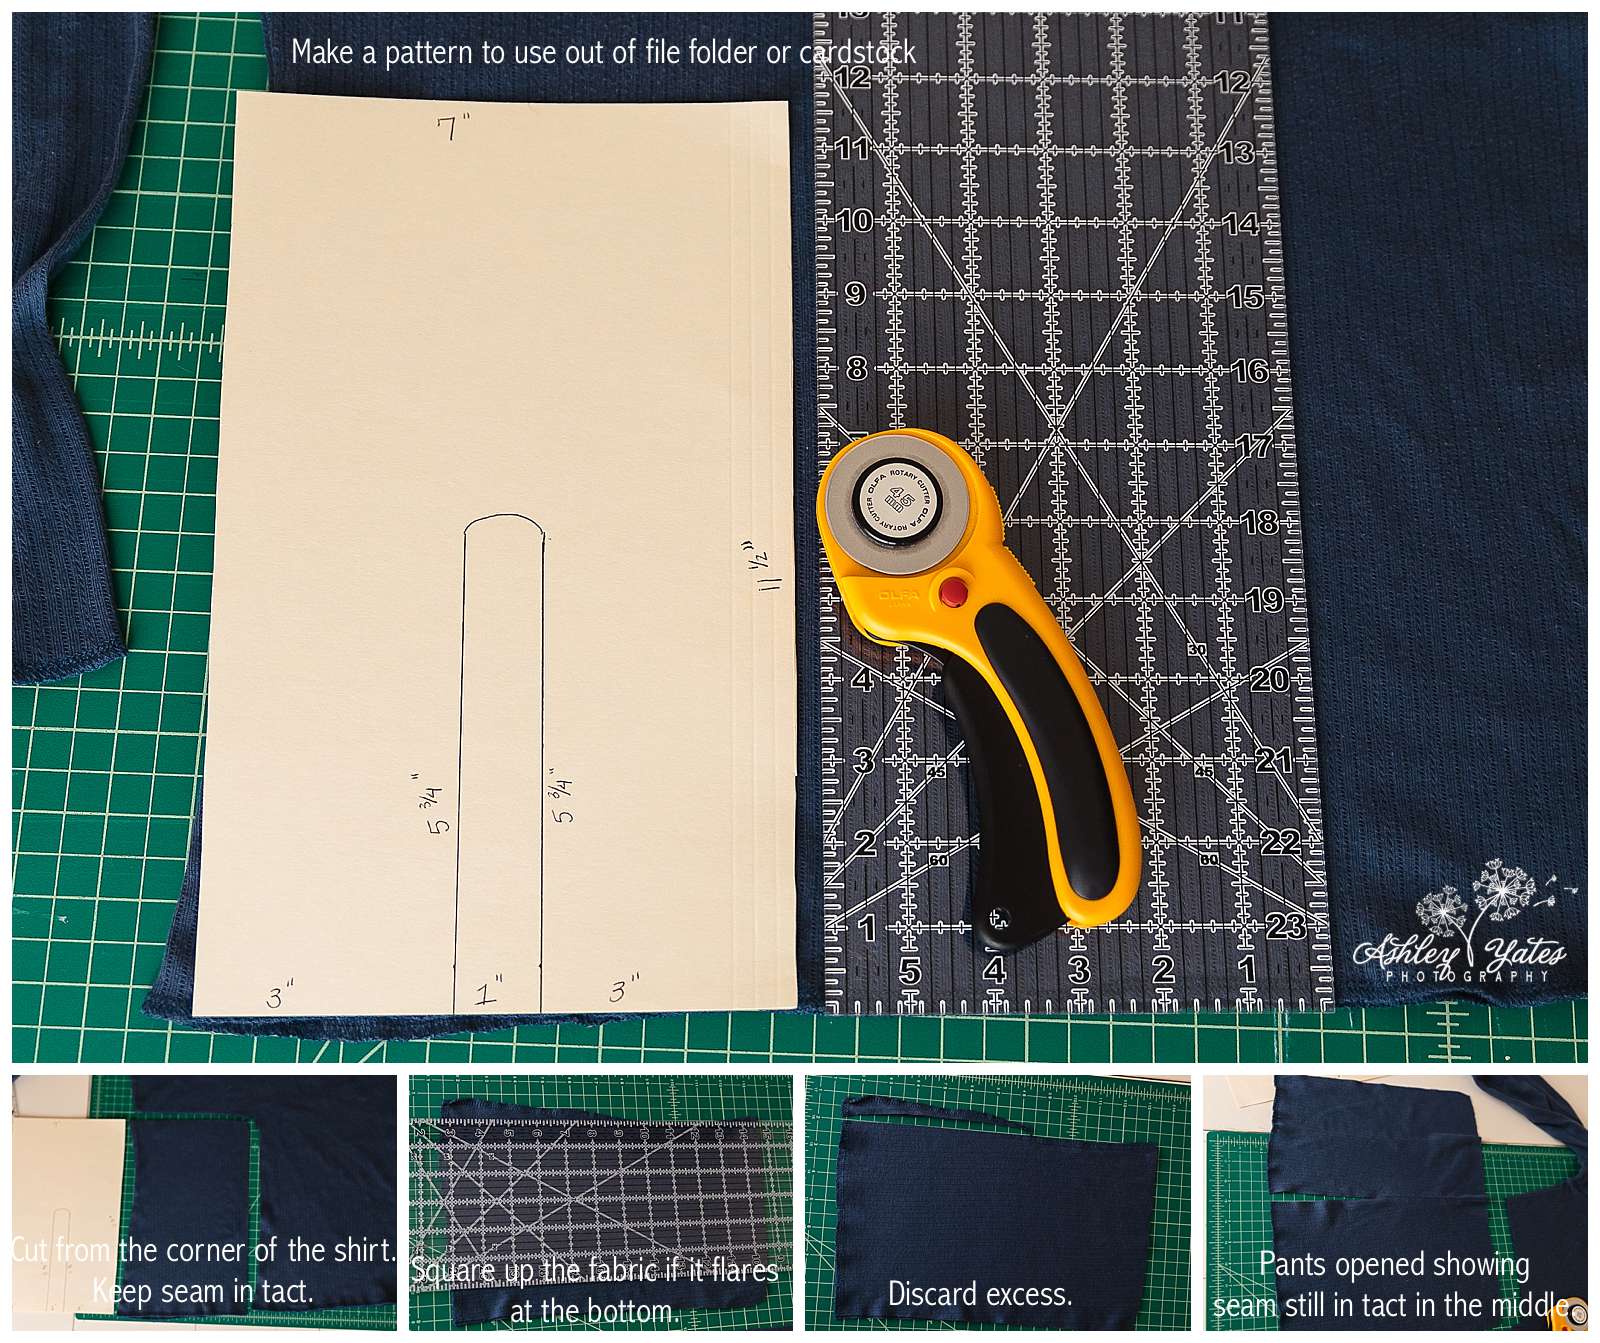
1. For the pants, cut a rectangle from the main body of the sweater. Using a piece of computer paper as a guide is a great tool as it gives the perfect length for the pants. I started by making a pattern from a file folder. If you plan on making more than one set this would be a great thing to make and keep for later use.
2. Place your pattern on the edge of the shirt so that you can use the seam that is already there. Cut through both the front and back panels of the shirt so that you have two identical rectangles. If your shirt has a little bit of a flare at the bottom like mine, square it up before going on to the next step.
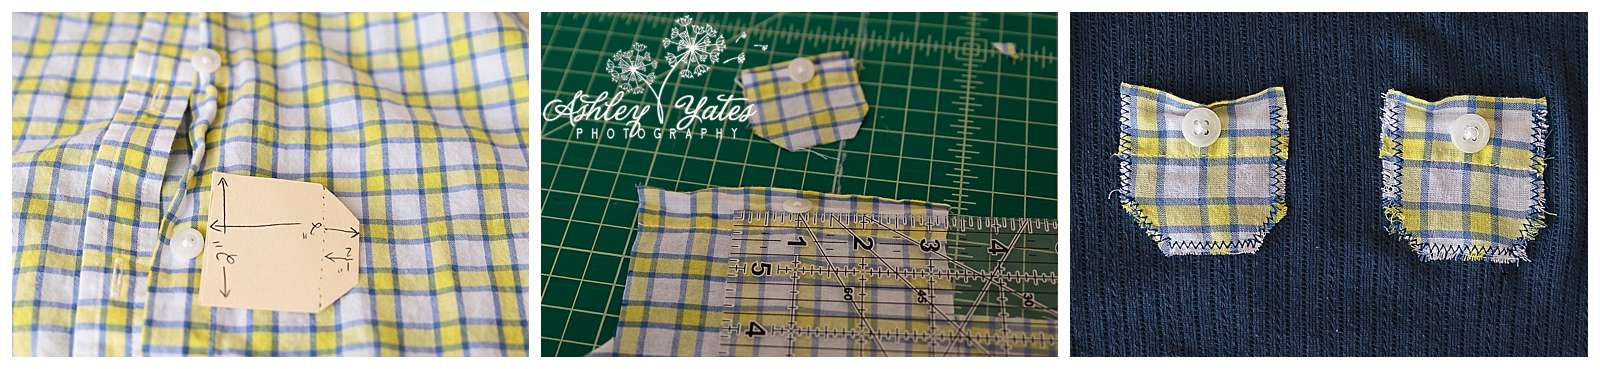
3. If you plan to add pockets, buttons or embellishments to the pants it is easiest to do before moving on to the next step. This is an optional step so skip ahead if you don’t want any extras.
I used a button-down shirt from goodwill that complimented the blue sweater. I was able to use the existing buttons as pockets for the pants by cutting a 2”x 2” square around the buttons.
First, I trimmed the edges off the bottom corners to create the desired shape for the pockets but you could easily adapt this into any shape you choose. Then, I sewed the pockets to the right side of the pants using a zig zag stitch. If you are sewing by hand, you could use a simple straight stitch as well.
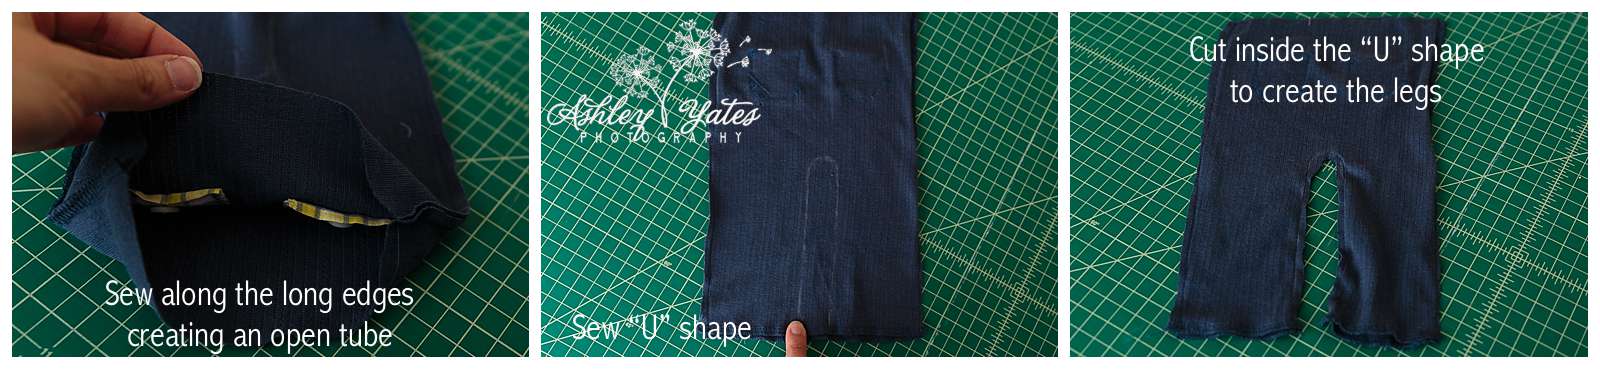
4. After attaching the pockets or any other embellishments, put the two pant piece rectangles right sides together and sew on the long sides, connecting the two pieces into a long tube. If you were able to use the seam that already existed, you will only have to sew the side that you cut.
5. Then sew a U shape about half way up from the bottom to create the legs as shown on the pattern piece.
6. Once the U shape is sewn, use scissors to cut in the middle of the U to separate the fabric into two legs.
7. At this point, you should have the basic shape of the pants. You should still have a hem on the pant legs intact from the bottom of the sweater. The top of the pants has a raw edge that we will need to take care of next.
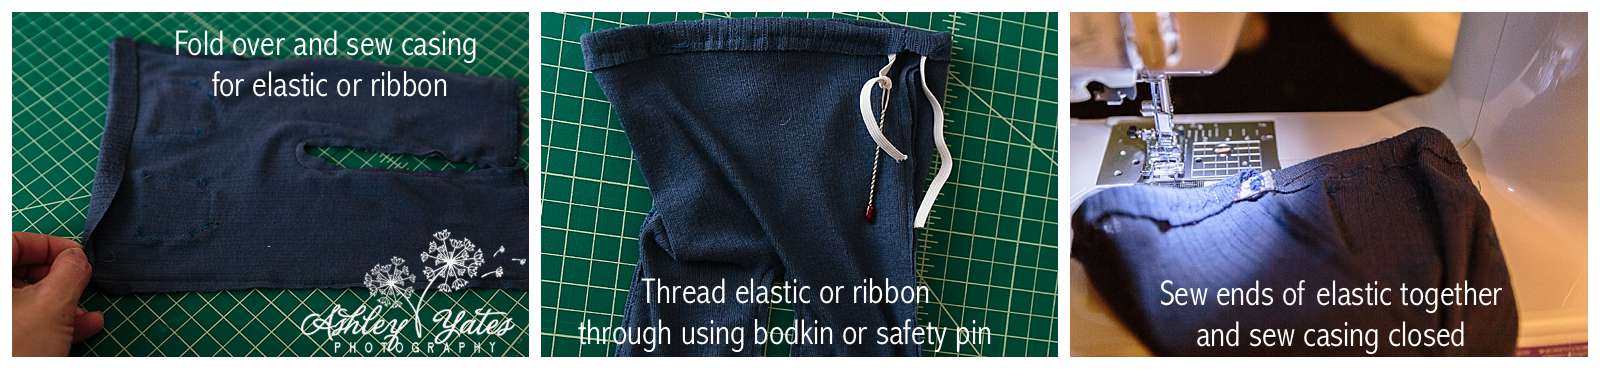
8. With the pants still inside out, fold down ½” for the waist and sew down. Leave a small opening in this hem to thread yarn, ribbon, or elastic to help hold the pants together at the waist.
9. It is easiest to attach the end of your yarn, ribbon, or elastic to a bodkin or safety pin and guide it through the casing you just created for the waist hem. Once you have it threaded all the way through you can sew the final part closed. If using elastic, sew the ends of the elastic together using a zig zag stitch before sewing the casing closed. If using yarn or ribbon, leave the ends loose so that you can tie them to fit baby.
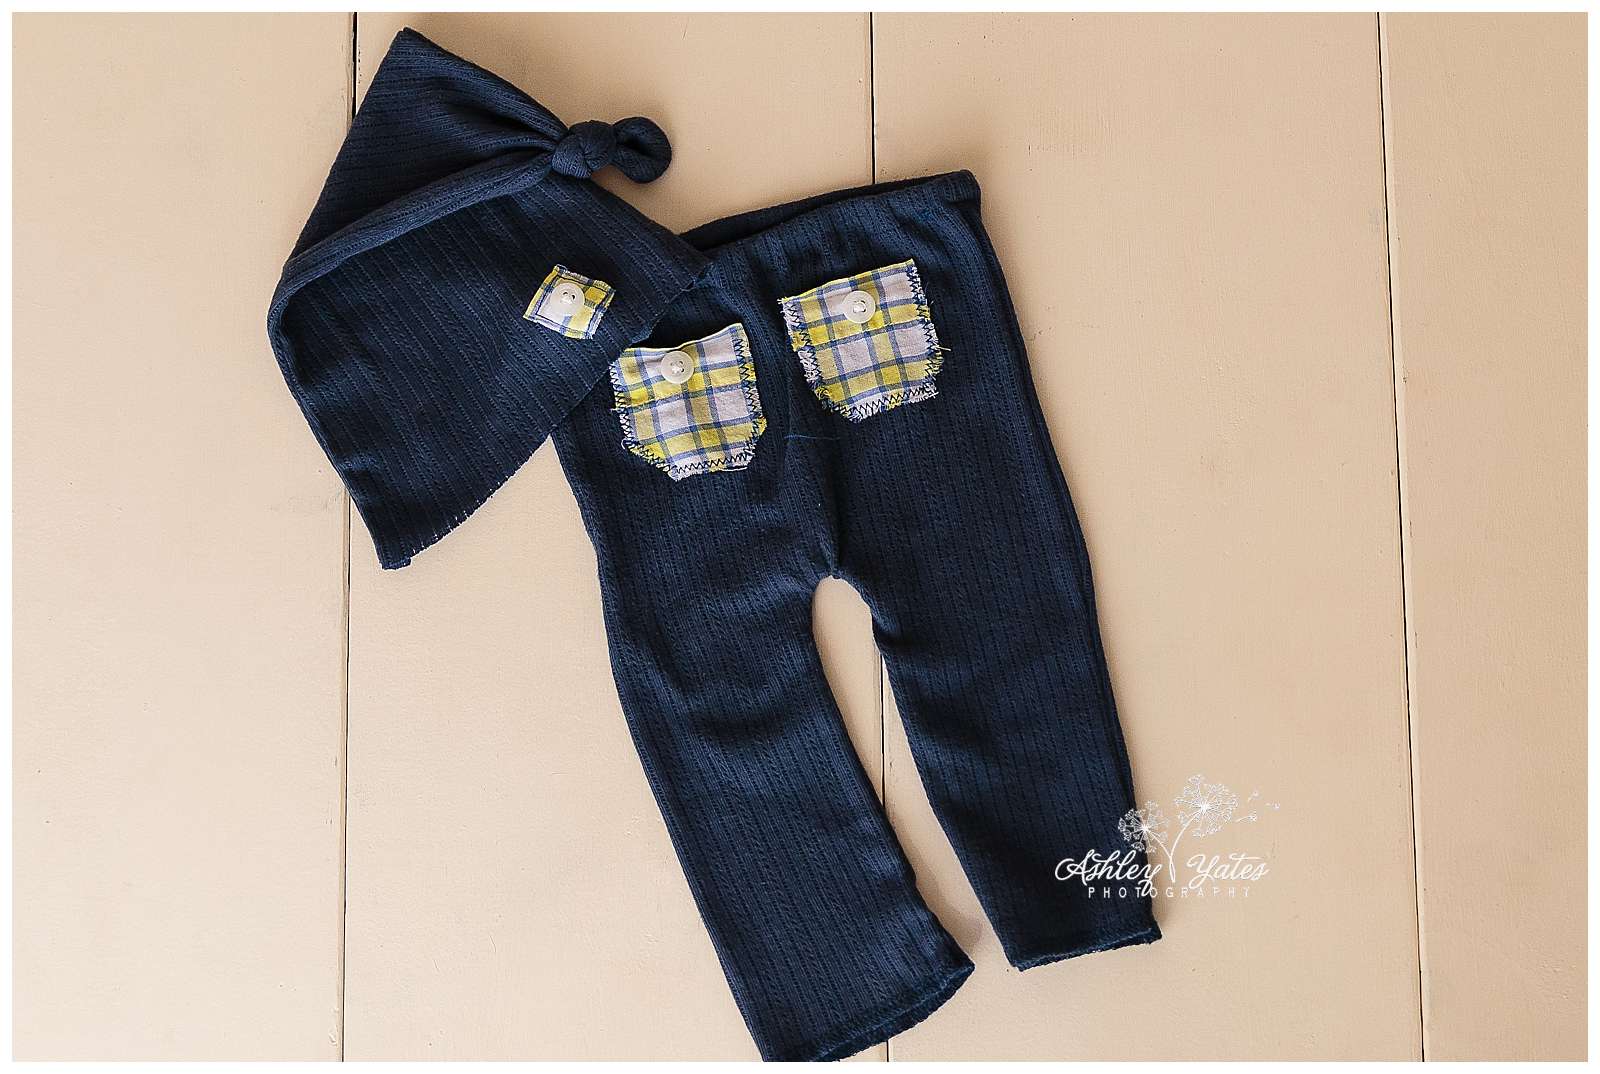
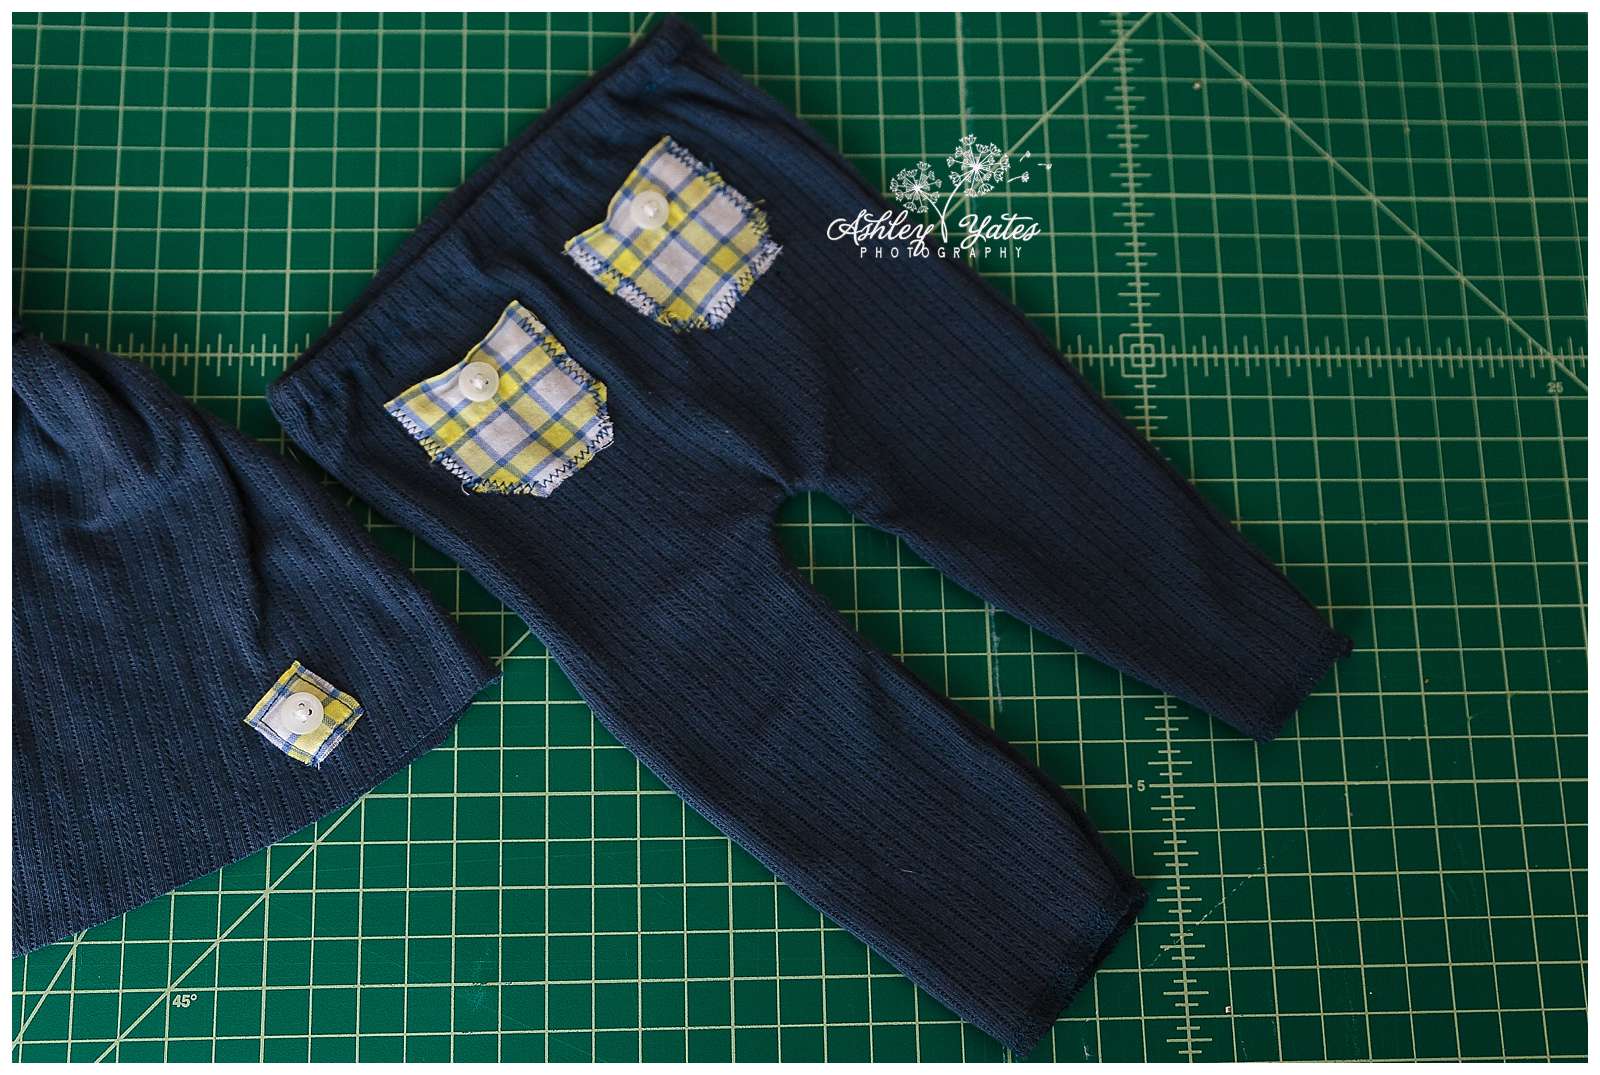
Result:
Once finished, turn the pants right side out and enjoy your handy work!
Knot style hat:
1. Find a portion of the sleeve that measures 6” in width – this will be the base of the hat. Then measure 12-14” from that point and cut (use a longer measurement for a longer hat).
2. Turn it inside out and sew the top edges together. Flip it back right-side out and tie a knot at the tip of the hat. This is the easiest method since you don’t have to sew anything. But if you have a thicker fabric, it will be harder to tie the top knot.
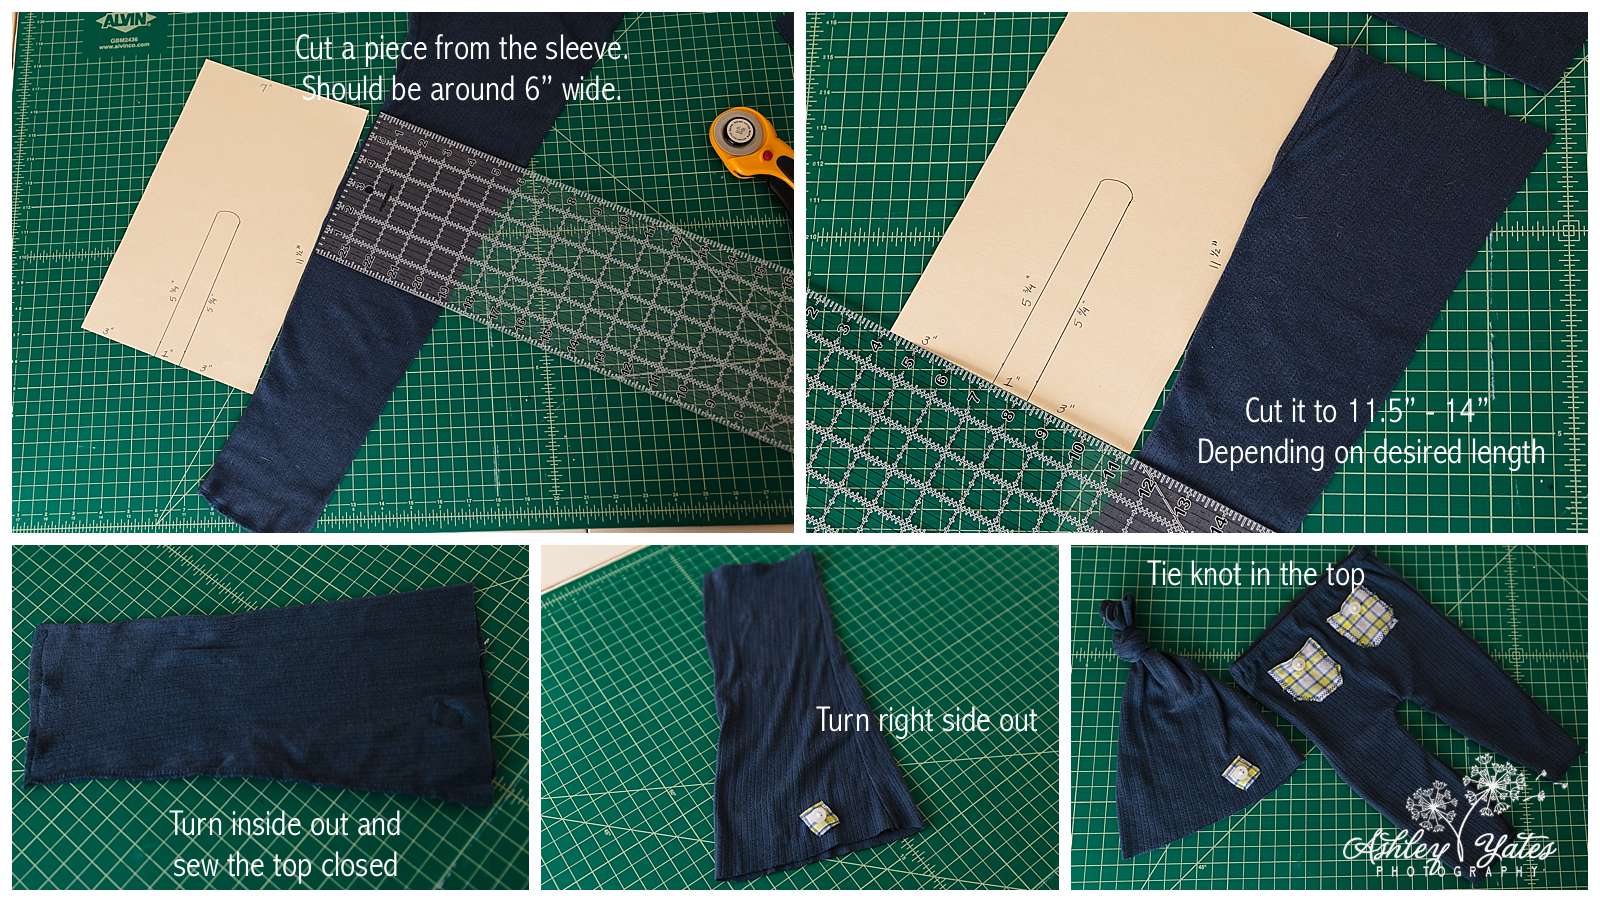
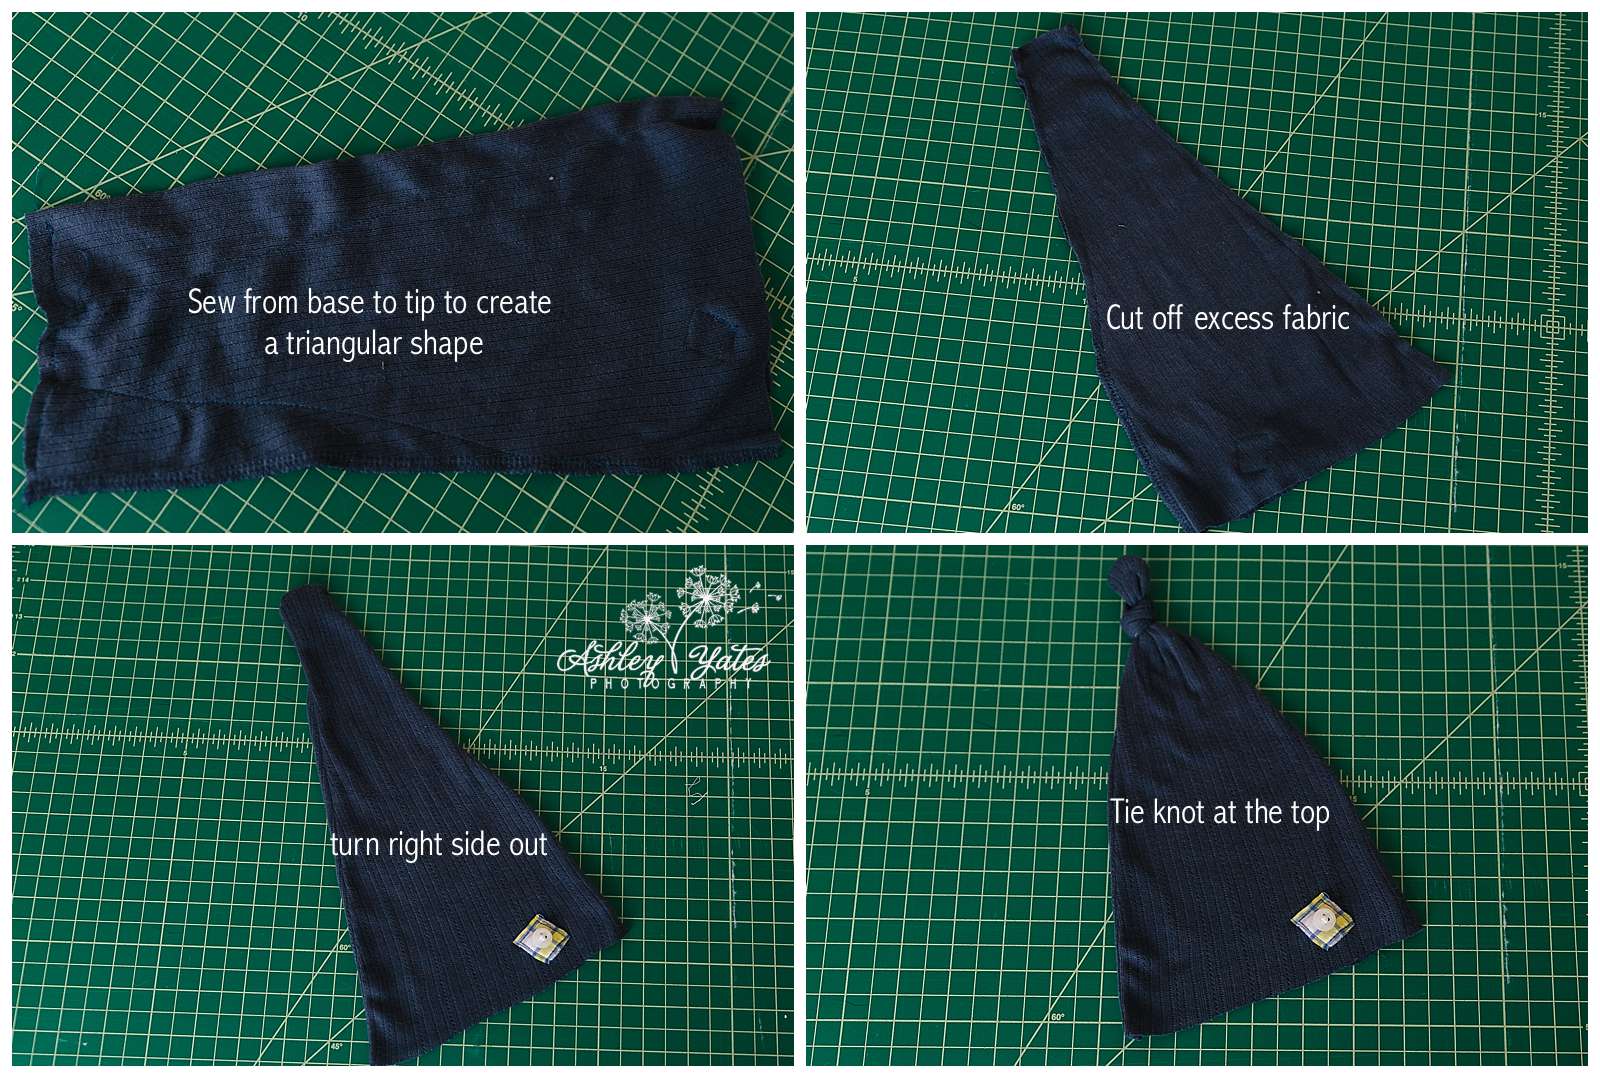
3. I wasn’t happy with how short the hat was with the chunky knot so I went ahead and made the hat thinner towards the top. To do that, turn it inside out and sew from the base to the tip to create more of a triangular shape. Then cut off the excess fabric at the edges. Turn it right side out and tie the knot. With less fabric, it is easier to tie the knot and the hat maintains more of the length.
4. Add any buttons or embellishments you want to the hat. For this hat, I used a 1” square that I cut from the button-down Goodwill shirt to match the pants.
Hat and pants together:
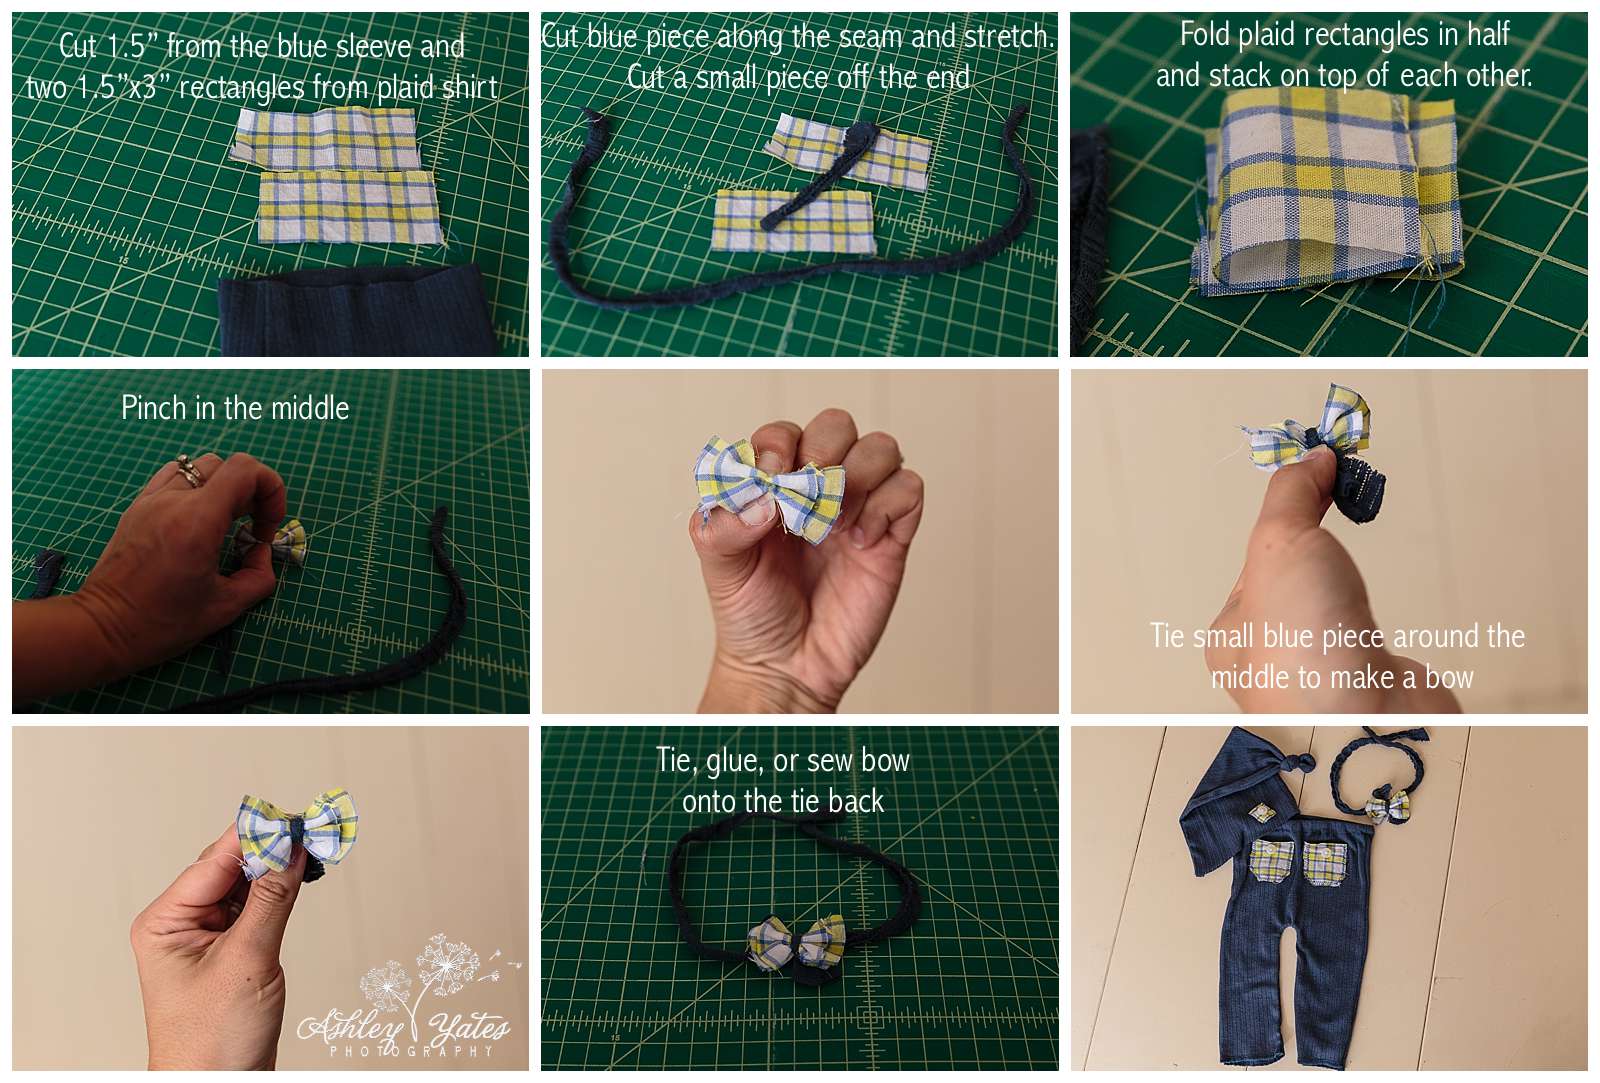
Tieback:
I could have stopped here and been happy with my work but I also wanted to make a matching tieback so this set would be versatile for boys and girls.
1. I used a scrap piece of the blue sleeve that was left over from the hat to cut a 1.5” strip. I stretched that piece of fabric as much as I could and cut it at the seam to make one long curly piece of fabric for the base of the tieback. From this long piece, I cut one shorter piece to use with the bow.
2. Then, cut two 1.5” x 3(ish)” rectangles from the plaid shirt, making one slightly shorter than the other. Next, fold the rectangles in half and stack the shorter one on top of the longer one. Pinch in the middle and tie using a small piece of the blue tieback material. At this point, you can attach the bow to the tieback in any way you choose – sewing, hot glue, or simply tying it on. I chose to sew it because I already had my machine out.
For this tutorial, I only made one pair of pants but I have plenty of blue and plaid material leftover for another pair. I paid roughly $11 for the two shirts used for this set.
I already had the thread and elastic on hand but even if you had to purchase those separately, you could still end up with two complete outfits for less than $10 each! You could also scavenge your own closet for a completely free project and clean out old clothes that you never wear anymore in the process. Double win!
End result:
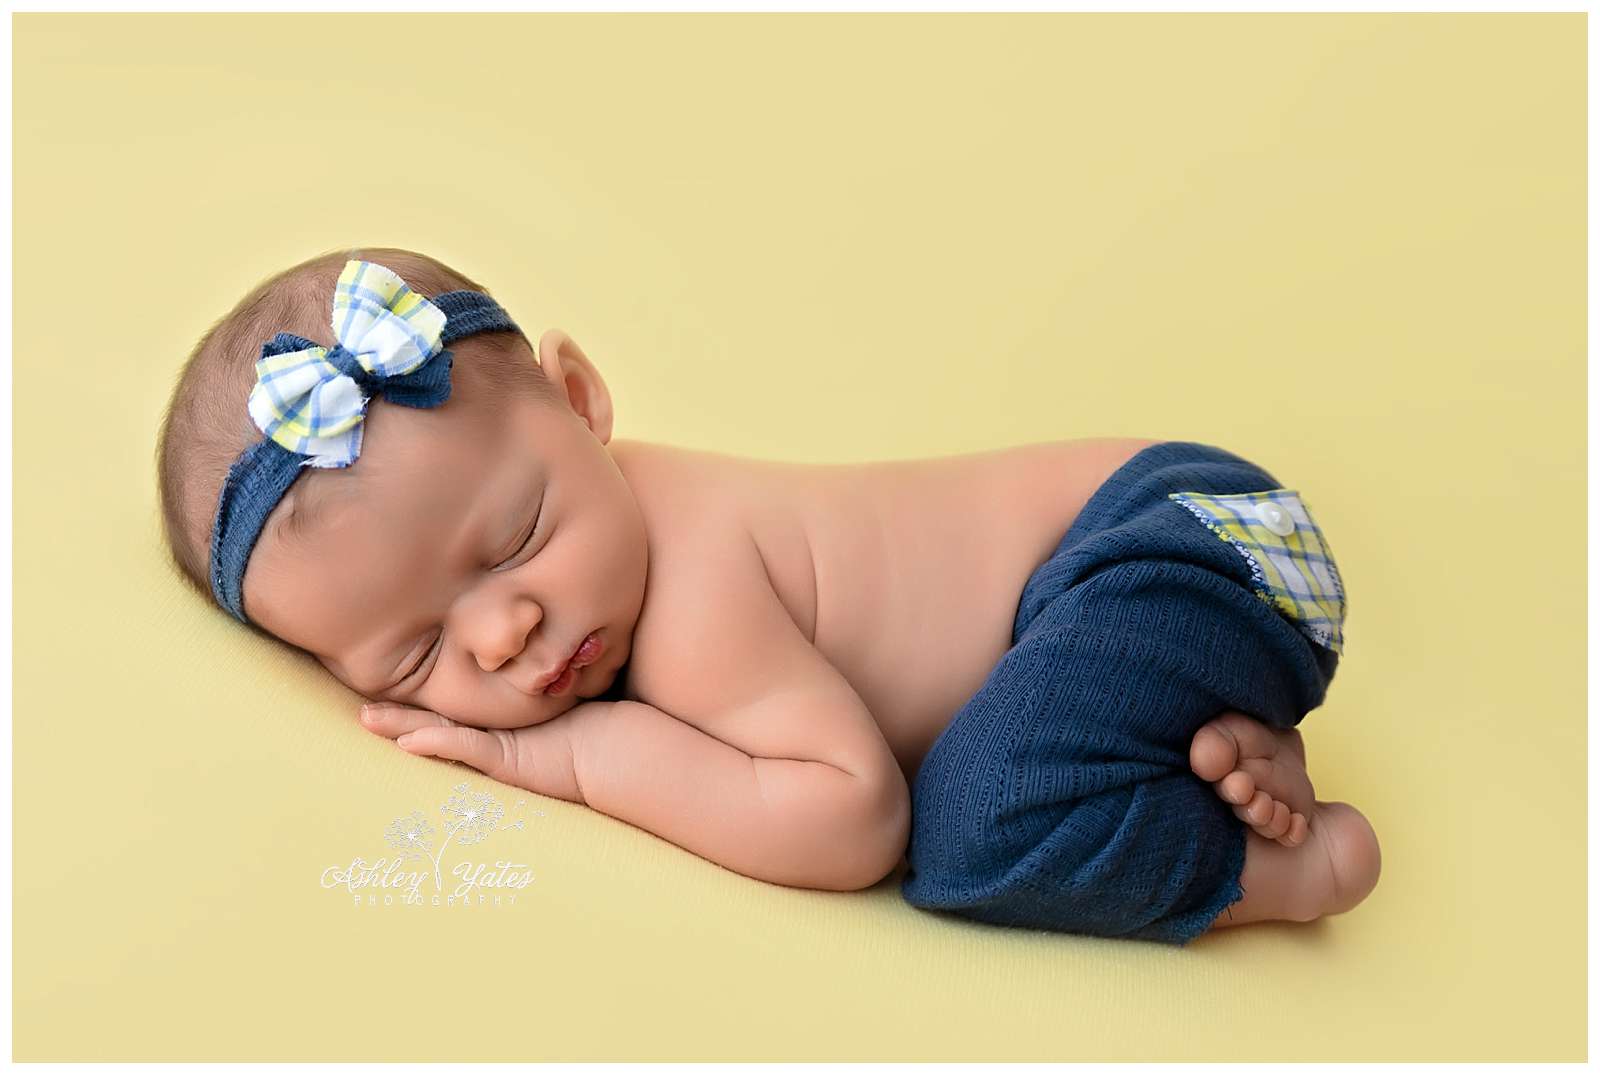
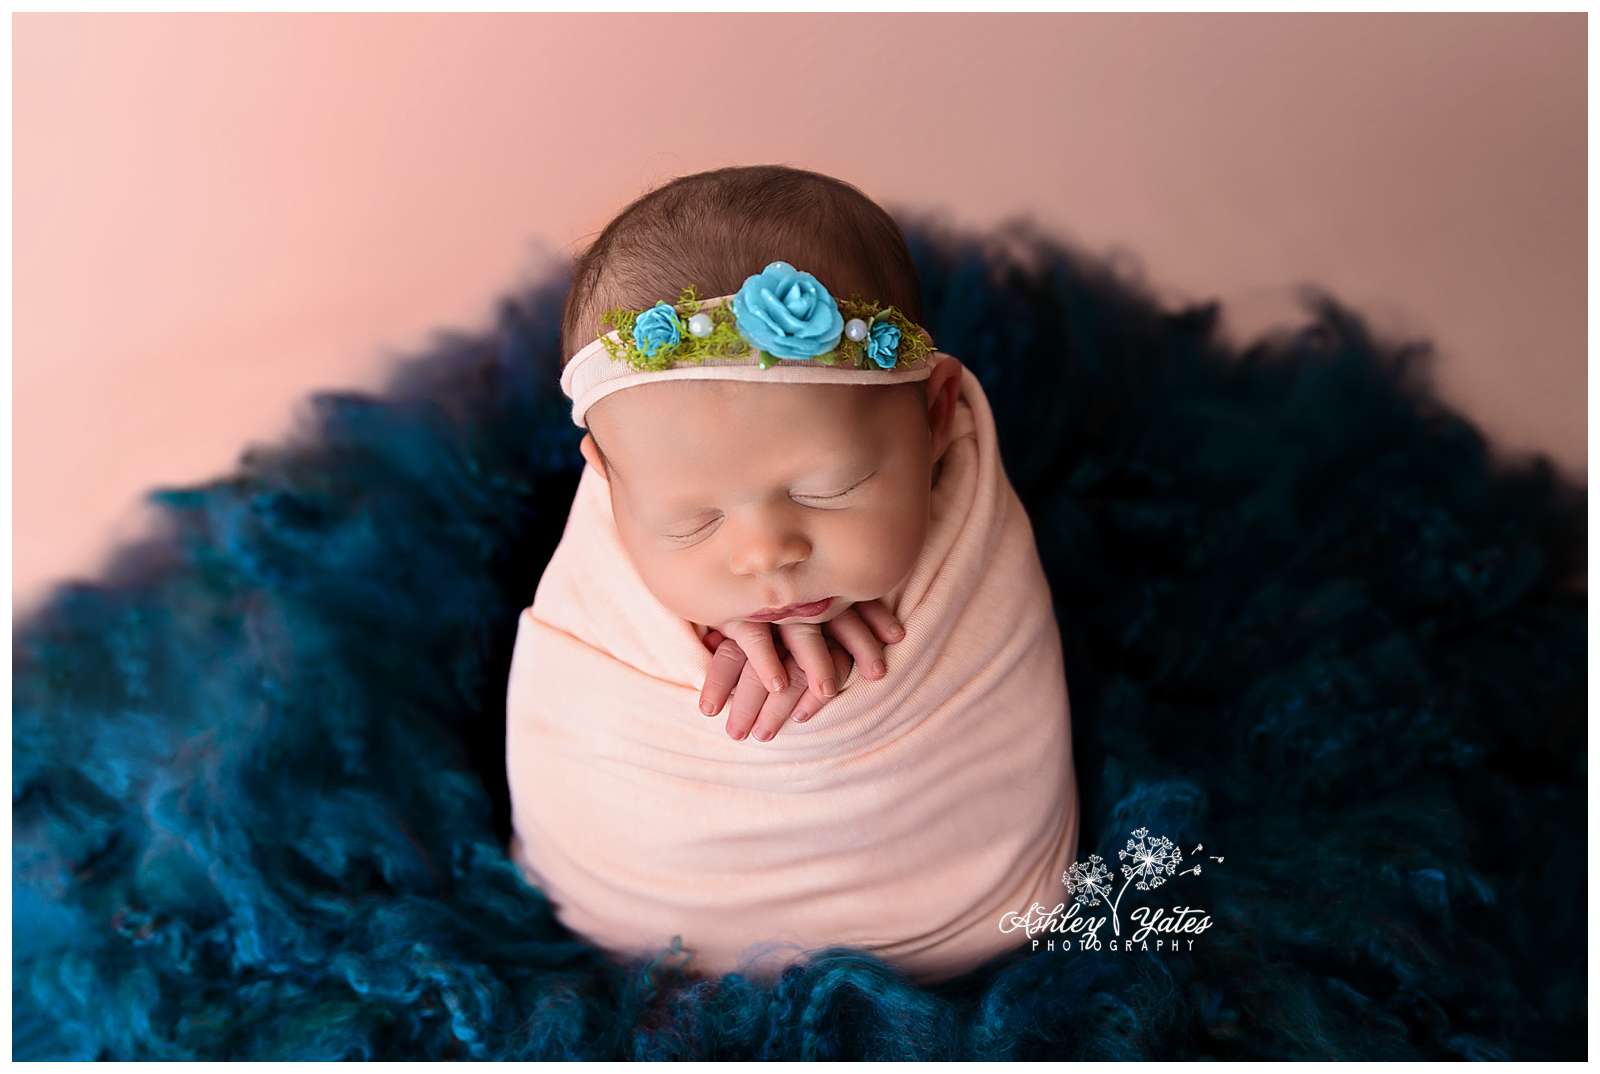
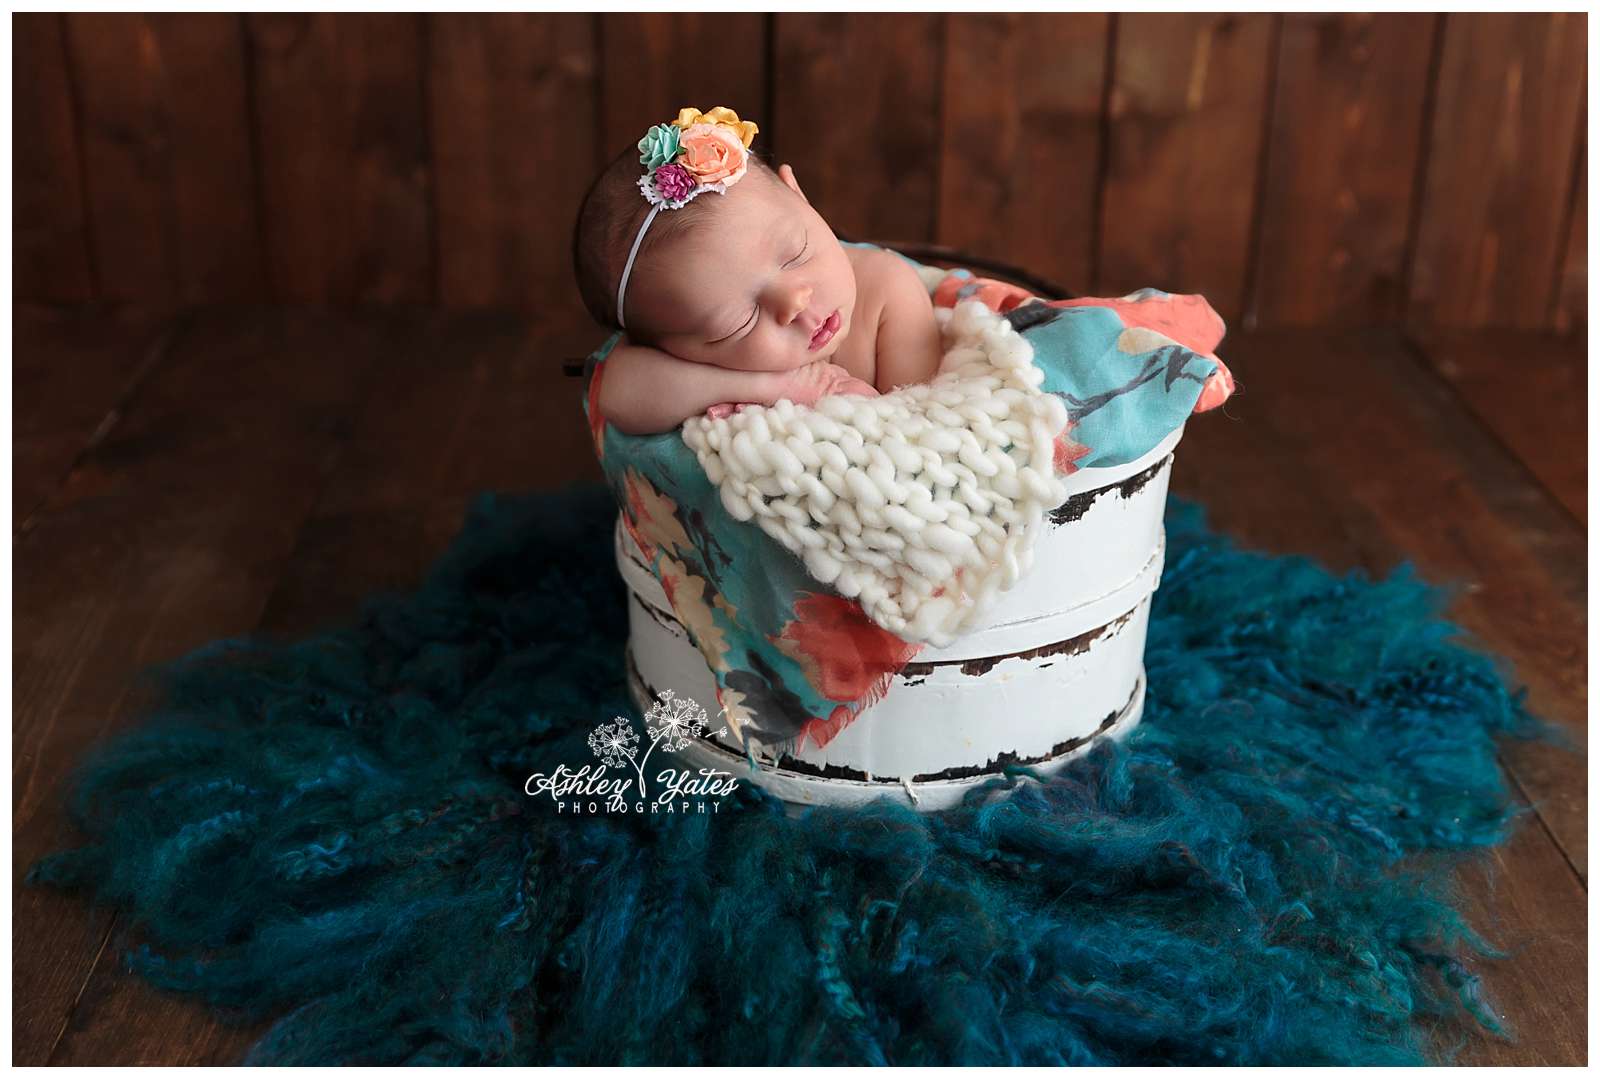
Photos by Ashley Yates
There you have it, 3 super simple DIY newborn props you can create in one afternoon for less than you’d spend on one ready-made prop! Plus, you can get creative and make any colors, patterns or sizes you want. These are perfect for the newborn photographer who is just starting out, or for anyone who loves to upcycle, craft or get creative with their photo props.
Hi from France Ashley,
Just a word : thanks !
Thanks because you answer to my question. I was wondering what size to take to craft a pants for newborn !
The dimensions to cut the pants are included in the photo above. It is basically a rectangle – 11.5 in x 7 in with an inseam of 5.75 in.